In this example we are going to connect to infrared motion detection sensor (various of sensors work, see bellow the ones we have tested).
Infrared motion detector sensors that we have tested
Name
Tested
HC-SR501
Tested by us
ST-00082 Mini
Tested by user
Mini IR Pyroelectric Infrared PIR Motion Human Sensor Detector Module
Tested by us
(Updated 24. Oct 2015, adding code with interrupts and changed setup to use a breadboard)
(Updated 8. Nov 2015, adding ST-00082 Mini sensor)
(Updated 1. May 2016, adding Mini IR Pyroelectric Infrared PIR Motion Human Sensor Detector module)
I found this sensor to be excellent, it gives readings when I expect it to and not readings when I don’t expect it to.
Disclaimer: We do not take any responsibility for possible errors in the guide or errors that you might do wiring it up. Incorrect wiring can result in damaged sensor or damaged Raspberry PI.
Pieces we use are:
Raspberry PI 2
Cobbler and Cobbler cable
HC-SR501 sensor (They go as low as $0.78 on Aliexpress where I got this one from probably even lower if you buy more than one unit). Or one of the other sensors that we have listed above.
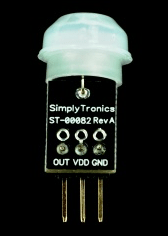
If you got the ST-00082 then the spec is very similar. It is easy replacement, on the ST-00082 yellow will go to OUT, red to VDD, and blue to GND.
ST-00082
If you got the one shown on the picture bellow then this one is the smallest one, we found no official name on it but its sold as “Mini IR Pyroelectric Infrared PIR Motion Human Sensor Detector Module”. WARNING do not attempt to connect it directly to the GPIO pin like the other sensors. Specs on its output pin on the net were fluctuating from 3.3V to 4 V so I measured just in case and found it to be 4.4 V ! Click here for guide on how to secure the GPIO pin for 4.4 V to be able to use this sensor.
This one we found no name for except just “Mini IR Pyroelectric Infrared PIR Motion Human Sensor Detector Module”
Note that when shown on the breadboard the sensor is shown from the other side, so check the picture above to make sure the wires go in right place.
(5V) Red is the 5V input – I always use red for the power input.
(GPIOX) Yellow is the Data pin.
(GND) Blue is the ground.
(Inspect your sensor carefully for markings, I have seen sensor of this type that had the pins in different order, mine had no markings on it so I just had to know the pin order)
In my example then I have it connected as follows:
Red to pin 2 (5V)
Blue to pin 39 (GND)
Yellow to GPIO 5 which is pin 29.
The Xojo code:
Using interrupts or not interrupts?
If just polling the hardware then you need to poll it in really tight loop which will occupy your Raspberry PI a lot, also even if you poll in really tight loop then you still can miss events. So usually you will want to use interrupts if you can.
But but wait, the interrupt code polls also!! Why is polling any better than polling?
Polling the interrupt counter you can do at low intervals making your Raspberry PI not hog the CPU, and still not miss any events as the interrupt handler has logged them down.
The Xojo code with interrupts:
When using interrupts then we must be really careful to not call anything from within the interrupt since Xojo does not support that. So the idea is we have a safe function that only logs the interrupt then we poll the log. That way event is never lost and timer or whatever method you use to poll does not need to be very intensive.
We just have a Window here with one Listbox on it and one Timer. You can set the Timer to 1000 or maybe 500 depending on what responsiveness your looking for.
The open event of the Window:
Sub Open()
GPIO.PinMode(5,GPIO.INPUT)
GPIO.PullUpDnControl(5,GPIO.PUD_DOWN)if GPIO.WIringPiISR(5,GPIO.EDGE_RISING, AddressOf InteruptModule.SensorInterupt)=-1then
MsgBox "Could not register interupt for pin number 5"returnendif
Timer1.Mode= Timer.ModeMultipleEndSub
The timer action event:
Sub Action()If InteruptModule.DetectionCount > 0then
Listbox1.AddRow("Motion detected")
InteruptModule.DetectionCount=0endifEndSub
We create a module called InteruptModule, the Module has one property and one method:
Protected DetectionCount AsIntegerProtectedSub SensorInterupt()// We need some pragmas here to make this safe since this is called from interupt.#Pragma StackOverflowChecking False#Pragma DisableBackgroundTasks
// We only count the events here.
DetectionCount = DetectionCount +1EndSub
We need to patch Paul’s GPIO module, adding the following to the module (the function we are adding likely already exists but is not fully implemented so verify that or just blindly override it) and remember to add the four constants also:
ProtectedConst EDGE_FALLING =1ProtectedConst EDGE_BOTH =3ProtectedConst EDGE_RISING =2ProtectedConst EDGE_SETUP =0ProtectedFunction WIringPiISR(pin asinteger,edgeType asinteger, p asptr)AsInteger//This function registers a function to received interrupts on the specified pin.// The edgeType parameter is either INT_EDGE_FALLING, INT_EDGE_RISING,// INT_EDGE_BOTH or INT_EDGE_SETUP. If it is INT_EDGE_SETUP then no// initialisation of the pin will happen – it’s assumed that you have already// setup the pin elsewhere (e.g. with the gpio program), but if you specify one// of the other types, then the pin will be exported and initialised as specified.// This is accomplished via a suitable call to the gpio utility program,// so it need to be available.//// The pin number is supplied in the current mode – native wiringPi, BCM_GPIO,// physical or Sys modes.//// This function will work in any mode, and does not need root privileges to work.//// The function will be called when the interrupt triggers.// When it is triggered, it’s cleared in the dispatcher before calling your// function, so if a subsequent interrupt fires before you finish your handler,// then it won’t be missed. (However it can only track one more interrupt,// if more than one interrupt fires while one is being handled then they will be ignored)//// This function is run at a high priority (if the program is run// using sudo, or as root) and executes concurrently with the main program.// It has full access to all the global variables, open file handles and so on.//// See the isr.c example program for more details on how to use this feature.#If TargetARM And TargetLinux ThenSoftDeclareFunction wpISR Lib"libwiringPi.so" Alias "wiringPiISR"(pin AsInteger, mode AsInteger, p asptr)asIntegerreturn wpISR(pin, edgeType,p)#EndifEndFunction
The Xojo code without using interrupts (polling the hardware directly):
I have a timer to poll the sensor. we set the timer up and the pin mode in the Window Open event.
Sub Open()Const kInfraRedSensorPin =5
GPIO.SetupGPIO
GPIO.PinMode(kInfraRedSensorPin, GPIO.INPUT)
Timer1.Mode= Timer.ModeMultiple
Timer1.Enabled=trueEndSub
In the Timer.Action event I got the following code:
(If you want it more responsive then you can increase the cycles of the for loop)
Sub Action()Dim i asIntegerConst kInfraRedSensorPin =5for n asInteger=1to10
i = GPIO.DigitalRead(kInfraRedSensorPin)if i =1then
Listbox1.AddRow"Motion detected"returnendif
App.DoEvents(1)next