In this example we are going to connect to MFRC-522 RFID reader.
The MFRC-533 is for 13.56 MHz RF tags.
This board like many other boards need fairly complex driver and since I believe Xojo should be about productivity and not always having to start from scratch at re-inventing the wheel then we will be using Python driver that already exists and then bridge the Python to Xojo, making this example very easy.

This is how the kit I bought came, it has the MFRC-522 RFID reader board, 2 sets of header pins (straight and with 90 degree angle), one RFID token, and two RFID cards.
You have to solder the header pins into the board. I choose the angled ones so I could easily stick the board into breadboard. In mater of seconds this was done. (If you have not experimented with hot air touch free soldering then I highly recommend doing so as once your there then there is no going back)
I was worried in this project that it would end up in drama at almost all stages but it turned out to be really easy, I had no fails at any stages of this experiment.
Disclaimer:
We do not take any responsibility for possible errors in the guide or errors that you might do wiring it up. Incorrect wiring can result in damaged relay board or damaged Raspberry PI. Connecting the high voltage connectors can potentially be life threatening, be careful and do at your own risk.
Pieces we use in this example:
- Raspberry PI 2 (or Raspberry PI 3)
- Cobbler and Cobbler cable
- Bread board
- MFRC-522 RFID reader board. (I paid $2.67 at some Ali Express seller, that included free shipping to Iceland)
- Einhugur PythonScript plugin for Xojo (don’t worry all the Einhugur plugins are free for Raspberry PI, if you don’t got licence then just download the Demo version, it will run as full version when compiled for Raspberry PI)
- MFRC-522 card reader python driver. We took open source driver from: https://github.com/rasplay/MFRC522-python
If you are not familiar with breadboards, how to place a cobbler on the breadboard or need to know how to read the color codings on the resistors then click here bellow
Using breadboard Resistor color codings
Wiring up the board
Once you have the header pins soldered in the board and your cobbler placed on the breadboard then here is how you will want to wire the MFRC-522 card reader:
SDA -> GPIO8
SCK -> GPIO11
MOSI -> GPIO10
MISO -> GPIO9
IRQ -> Not connected
GND-> GND
RST -> GPIO25
3.3V -> 3.3V

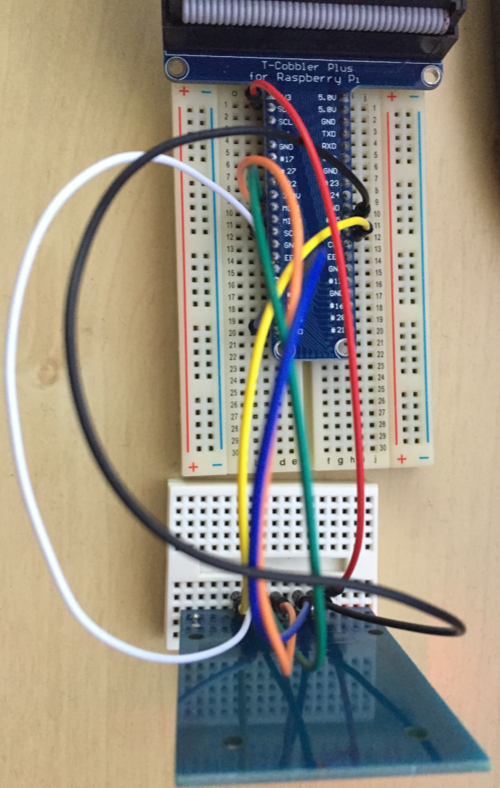
Here is how it ended for me:
Making sure things work before we use Xojo
When you power up the Raspberry PI then the MFRC-522 RFID reader board should have one light on it.
You need to do some configurations to prepare connecting to this device:
- Enable SPI in Raspberry PI settings. (This may call for reboot to get this to work)
If all is ok then you should be able to type into console now:
ls /dev/spidev0.*
It will give you response with yellow letters if all is ok. - Install Python dev and SPI-py
sudo apt-get update
sudo apt-get install python-dev
git clone https://github.com/lthiery/SPI-Py.git
cd SPI-Py
sudo python setup.py install - Get the MFRC-522 driver
git clone https://github.com/rasplay/MFRC522-python.git - Test:
cd MFRC522-python
sudo python read.pyScan your cards or tokens.(If the test fails then you can refer to this page for example for trouble shooters. There are many pages that have info on how to connect to this device using Python).
Making Xojo use the Python driver
Assuming the Python test above passed then we proceed to make Xojo application use the Python driver.
First grab Einhugur Python script plugin from the Einhugur web. (If you don’t got license then grab the Demo version, it will run as full version on Raspberry PI since Einhugur Plugins are free on Raspberry PI). You will want the one called PythonScript and not Python3Script, since the device driver we use is made for Python 2.7.x.
We write a small python stub to interface with the Python Driver: (The file for it is also included with the downloadable example project)
import MFRC522
import signal

MIFAREReader = MFRC522.MFRC522()

def CleanUp():
    MIFAREReader.GPIO_CLEEN()


def Read():
  (status,TagType) = MIFAREReader.MFRC522_Request(MIFAREReader.PICC_REQIDL)
  if status == MIFAREReader.MI_OK:
  	(status,backData) = MIFAREReader.MFRC522_Anticoll()
  	if status == MIFAREReader.MI_OK:
  		return str(backData[0])+","+str(backData[1])+","+str(backData[2])+","+str(backData[3])+","+str(backData[4])
  	else:
  		return ""
  else:
  	return ""
Then the Xojo code will be something like this:
Window Open event:
  Sub Open()
 Dim func as PythonFunction
 Dim params as PythonParameters
 Dim result as PythonResult
 Dim f as FolderItem

 // We dont expect any console output so we just wire it to simple handler that puts up message box, this might give us hints on unexpected errors
 PythonScript.SetConsoleOutput(new ConsoleHandler())

 #if TargetMacOS
 f = App.ExecutableFile.Parent.Parent.Parent.Parent.Child("PythonModules")
 #elseif TargetWin32 or TargetLinux
 f = App.ExecutableFile.Parent.Child("PythonModules")
 #endif

 // Add search path where Python can find our module
 PythonScript.AddSearchPath(f)

 // We try to load the Python module
 package = PythonScript.GetModule("RFIDRead")

 if package= nil then
 MsgBox "Could not load module"
 Quit()
 end if


End Sub
The timer event for a Poll timer:
  Sub Action()
 Dim func as PythonFunction
 Dim result as PythonResult
 Dim stringResult as String

 // See if we can find function called multiply in the module
 func = package.GetFunction("Read")

 if func <> nil then

 result = func.Invoke(nil)

 if result <> nil then
 stringResult = result.StringValue

 if stringResult <> "" then
 Listbox1.AddRow(stringResult)
 end if
 else
 if PythonScript.ErrorOccurred then
 MsgBox PythonScript.GetError()
 PythonScript.ClearError()
 end if
 end if
 else
 MsgBox "Could not load function: Read"
 btnStop.Push()
 end if
End Sub
Cleanup in the Window close event:
 Sub Close()
 if package <> nil then
 Dim func as PythonFunction
 Dim stringResult as String

 func = package.GetFunction("CleanUp")

 if func <> nil then
 call func.Invoke(nil)
 else
 MsgBox "Could not load function: CleanUp"
 end if
 end if
End Sub
Downloading the code:
Bellow is a download link to download the code. Make sure after you compile to create folder called PythonModules at same place as your application is and drop into that the Python driver for the RFID reader and the Python stub we created.
Thats it for now !